Get a working YS Desk Web Chat integration running in a few minutes. This guide takes you through the complete visitor-to-agent flow: install Web Chat, send a test message, receive the conversation in the YS Desk Inbox, and reply to the visitor.
What You’ll Build
By the end of this quickstart, you will have verified this complete flow:
Visitor
↓
Web Chat
↓
Test Message
↓
YS Desk Inbox
↓
Agent Reply
↓
Visitor Receives Reply
The quickstart focuses on verifying a complete Web Chat conversation. For detailed installation and configuration options, see [Web Chat → Installation].
Prerequisites
Before starting, make sure you have:
- An active YS Desk Workspace.
- An active Web Chat channel.
- The Web Chat Channel Token.
- The website you want to use for the test.
- An Agent who can access the Workspace Inbox and respond to Conversations.
For the complete Channel Token and domain configuration requirements, see [Web Chat → Installation].
Step 1 — Get Your Web Chat Channel Ready
In the YS Desk dashboard:
- Open Channels.
- Select your Web Chat channel.
- Open Integration Code.
- Copy the generated installation snippet or Channel Token.
Make sure the Web Chat channel is active before continuing.
The detailed installation and website authorization process is documented in [Web Chat → Installation].
Step 2 — Add Web Chat to Your Website
For a quick test, create a simple HTML page and add the YS Desk Web Chat installation snippet.
<!DOCTYPE html>
<html lang=”en”>
<head>
<meta charset=”UTF-8″>
<title>YS Desk Web Chat Test</title>
</head>
<body>
<h1>YS Desk Web Chat Test Page</h1>
<p>The Web Chat launcher will appear on this page.</p>
<script>
(function(w, d, s, o, f, js, fjs) {
w[‘YSDeskSDK’] = w[‘YSDeskSDK’] || function() {
(w[‘YSDeskSDK’].q = w[‘YSDeskSDK’].q || []).push(arguments)
};
js = d.createElement(s), fjs = d.getElementsByTagName(s)[0];
js.id = o;
js.src = f;
js.async = 1;
fjs.parentNode.insertBefore(js, fjs);
}(
window,
document,
‘script’,
‘YSDeskSDK’,
‘https://app.ysdesk.com/sdk.js’
));
window.YSDeskSDK(‘run’, {
token: ‘YOUR_CHANNEL_TOKEN’
});
</script>
</body>
</html>
For production placement, SPA integration, and domain configuration details, see [Web Chat → Installation].
Step 3 — Open the Website as a Visitor
Open the test page in your browser.
Verify that:
- The Web Chat launcher appears.
- Clicking the launcher opens the Web Chat interface.
- The message composer is available.
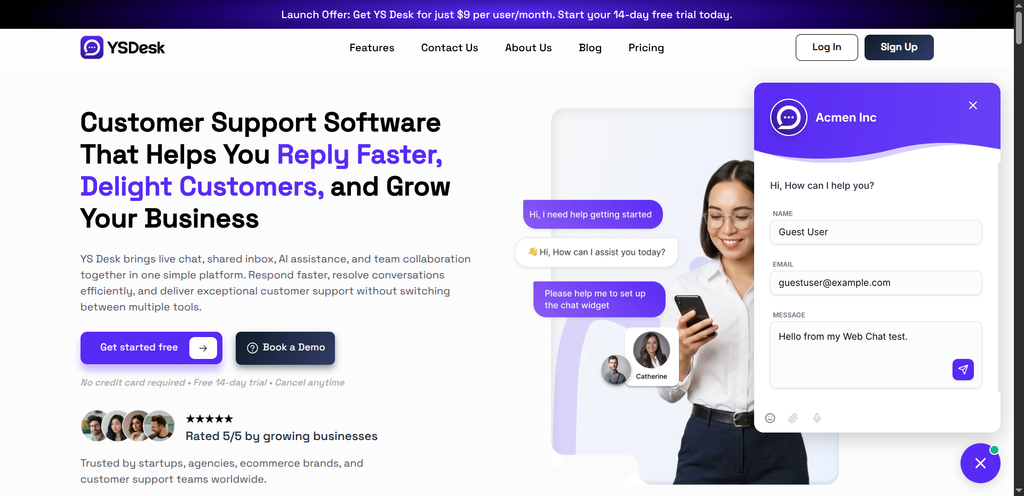
Figure WC-04 — The YS Desk Web Chat interface open on a test webpage.
Step 4 — Send a Test Message
In the Web Chat message composer, enter:
Hello from my Web Chat test.
Click Send.
Verify that the message appears in the Web Chat conversation as an outgoing visitor message.
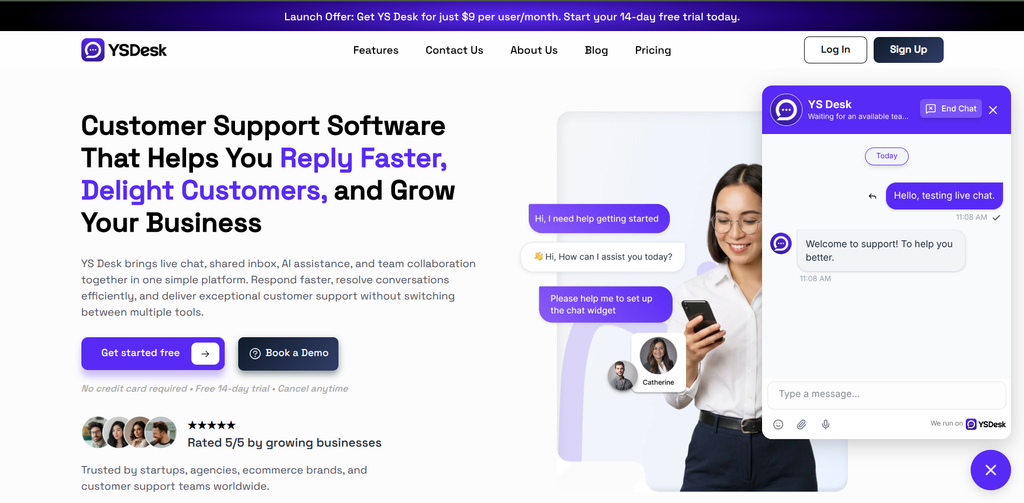
Figure WC-05 — Sending a test visitor message from the Web Chat widget.
Step 5 — Reply from the YS Desk Inbox
Open the YS Desk dashboard in another browser tab or window.
- Open Inbox.
- Select Unassigned or All.
- Open the Conversation created by the test visitor.
- Enter:
Hello! Your Web Chat integration is working.
- Click Send.
The Conversation should contain the original visitor message and the Agent reply.
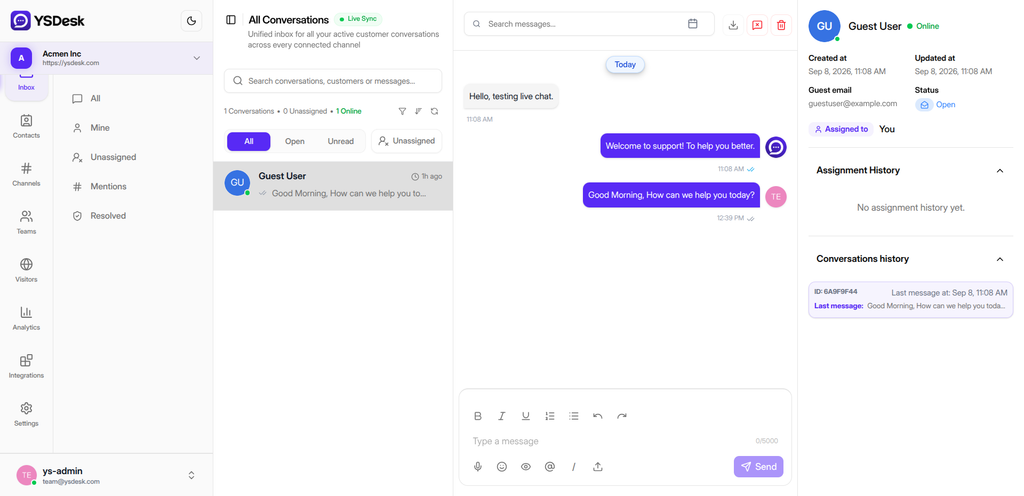
Figure WC-06 — Viewing and responding to the incoming conversation in the YS Desk Inbox.
Step 6 — Confirm the Visitor Receives the Reply
Return to the website where Web Chat is open.
The Agent’s reply should appear in the visitor’s conversation without requiring a page refresh.
A successful test confirms the complete communication path:
Visitor
↓
Web Chat Message
↓
YS Desk Inbox
↓
Agent Reply
↓
Web Chat Visitor
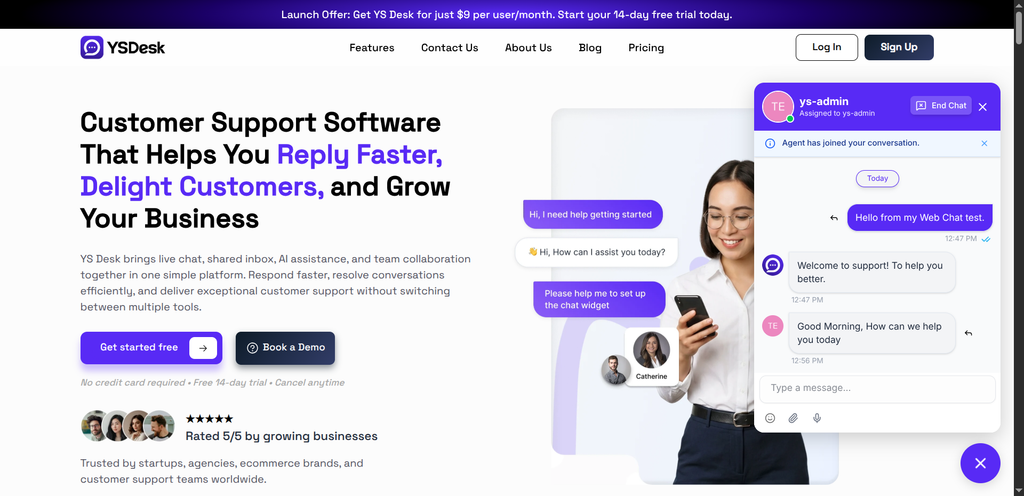
Figure WC-07 — Completed bidirectional conversation loop between visitor and agent.
Quickstart Success Criteria
Your Web Chat integration is working when all of the following are true:
| Check | Expected Result |
| Web Chat launcher | Appears on the website |
| Chat window | Opens successfully |
| Visitor message | Appears in the Web Chat conversation |
| Inbox conversation | Appears in YS Desk |
| Agent reply | Can be sent from the Inbox |
| Visitor reply | Appears in Web Chat without a page refresh |
Troubleshooting
Web Chat Launcher Does Not Appear
Check the browser Developer Tools console for messages prefixed with:
[YSDeskSDK]
Verify that the Channel Token in the installation snippet is correct and that the Web Chat channel is active.
For detailed installation troubleshooting, see [Web Chat → Installation].
Website Domain Is Not Authorized
If Web Chat reports that the website is not authorized, verify that the production hostname is configured under:
Settings → Workspace Settings → Workspace Information → Workspace Domain
Conversation Does Not Appear in the Inbox
Open Inbox → Unassigned or Inbox → All and check for the new Conversation.
Make sure the Web Chat message was successfully sent from the visitor interface.
Agent Reply Does Not Appear for the Visitor
Verify that:
- The Agent message was successfully sent.
- The visitor Web Chat remains open.
- The browser still has an active network connection.
If the problem persists, review the Web Chat real-time behavior documented in [Web Chat → Messaging & Media] and [Real-Time].
End-to-End Quickstart Flow
The complete test can be summarized as:
YS Desk Workspace
↓
Active Web Chat Channel
↓
Channel Token
↓
Website with Web Chat
↓
Visitor Opens Web Chat
↓
Visitor Sends Message
↓
Conversation Appears in Inbox
↓
Agent Replies
↓
Visitor Receives Reply
Need Help?
Email: support@ysdesk.com
Documentation: https://docs.ysplugins.com/ys-desk